To identify a device with Windows Autopilot, the device’s unique hardware identifier (hardware hash) must be captured and uploaded to the Windows Autopilot service. This is usually the first step when you want to provision a machine using Windows Autopilot. The autopilot hardware hash can be uploaded by the manufacturer/reseller for new devices. However, hardware hash needs to be collected manually for the devices that are already in a corporate environment and not already enrolled in Microsoft Intune.
In this blog post, we will discuss different ways to collect hardware hash from existing devices.
Related Post: Windows 10 Autopilot Deployment Guide | Intune
- Get Hardware Hash Using Get-WindowsAutoPilotInfo.ps1 Script
- Get Device Information (Hardware Hash) for Local Device
- Get Hardware Hash for Remote Device
- Get Hardware Hash for Multiple Remote Computers (Input from text file)
- Get hardware hash for Multiple Remote Devices ( Input from csv file)
- Get Device Information (Hardware hash) for Multiple Remote Devices ( Input from SCCM Collection)
- Get Device Hardware Hash Details From SCCM
- Related Posts:
Get Hardware Hash Using Get-WindowsAutoPilotInfo.ps1 Script
The Get-WindowsAutoPilotInfo script uses WMI to retrieve properties needed for a device to register with Windows autopilot. This script obtains hardware hash from local or remote devices. You can download the PowerShell script (Get-WindowsAutoPilotInfo.ps1) from the PowerShell gallery.
Get Device Information (Hardware Hash) for Local Device
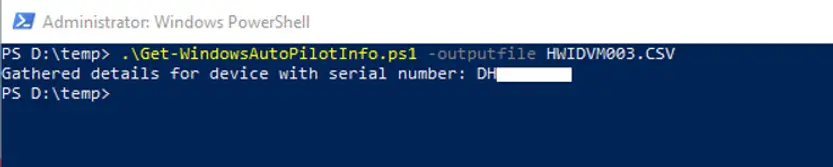
To collect hardware hash for a local computer, copy the script on the local computer and use the below command line. The script exports hardware hash in a CSV file in the current directory.
Get-WindowsAutoPilotInfo.ps1 -outputfile HWIDVM003.CSV
Get Hardware Hash for Remote Device
You can use the above script to get hardware hash for autopilot for a remote computer. You need to run the script with -ComputerName parameter.
Get-WindowsAutoPilotInfo.ps1 -ComputerName TESTDEVICE01 -OutputFile deviceinfo.csv

Get Hardware Hash for Multiple Remote Computers (Input from text file)
We have shown how to get hardware hash for autopilot for a remote computer in the last example. However, the example was for a single remote computer. To get hardware hash for multiple remote computers, the input can be provided from a text file. The computer’s name should be provided in a text file in the below format.
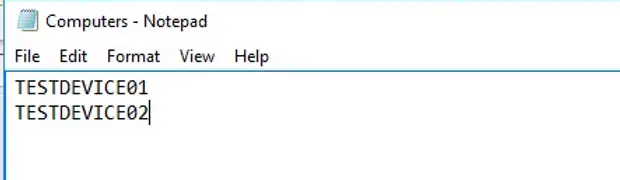
Use the below command line to get the autopilot hardware hash for all computers in a text file. The script will export the hardware hash in CSV file in the current directory. Please note that all devices should be online and necessary ports should be open in the firewall to establish a connection with remote WMI.
Get-content .\Computers.txt | .\Get-WindowsAutoPilotInfo.ps1 -OutputFile deviceinfo.csv

Get hardware hash for Multiple Remote Devices ( Input from csv file)
To get hardware hash for multiple remote computers, the input can be provided from a CSV file. The computer’s name should be provided in CSV file in the below format. Please note that ComputerName column header is mandatory when you provide input from a CSV (Comma Separated File).
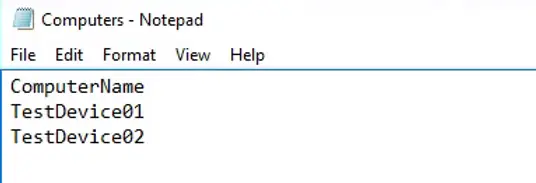
CSV file format for Get-WindowsAutoPilotInfo.ps1
Use the below command line to collect the hardware hash. The script will export hardware hash in CSV file in the current directory.
Import-Csv -path .\computers.csv | .\Get-WindowsAutoPilotInfo.ps1 -OutputFile deviceinfo.csv

Get Device Information (Hardware hash) for Multiple Remote Devices ( Input from SCCM Collection)
The Get-WindowsAutopilotInfo script also accepts the input directly from the SCCM collection. To get the hardware hash for members of the SCCM collection, you need to get the list of collection members using Get-CMCollectionMember cmdlet and pass the input to Get-WindowsAutopilotInfo script.
Follow the below steps to get hardware hash for a member of the SCCM collection. Similar to the input provided from CSV / Text file, this method also requires that the machine is online as the script will gather the information by connecting to a remote computer WMI.
- Open Windows Powershell with Local Administrator permission
- Set execution policy to unrestricted (Set-ExecutionPolicy Unrestricted -Scope currentuser)
- Import Configuration Manager Powershell Module (Import-Module ‘C:\Program Files\Microsoft Configuration Manager\AdminConsole\bin\ConfigurationManager.psd1’)
- Change drive letter to SCCM site code ( e.g, CD P01)
- Use the below command to obtain the hardware hash.
Get-CMCollectionMember -CollectionName “Test VMs” | D:\temp\Get-WindowsAutopilotInfo.ps1 -OutputFile D:\temp\deviceinfo.csv

Get Device Hardware Hash Details From SCCM
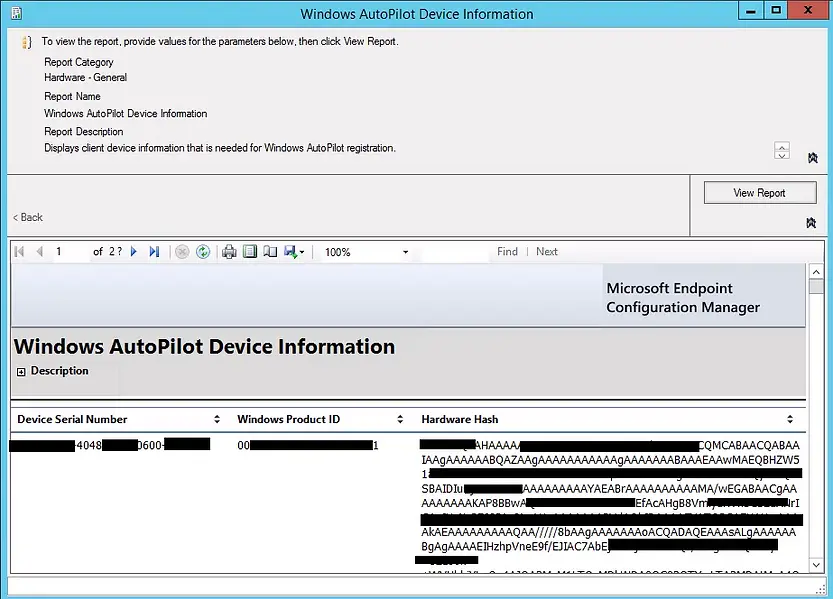
SCCM Report: Windows AutoPilot Device Information
The built-in SCCM report “Windows AutoPilot Device Information” pulls out hardware hash for SCCM clients. SCCM collects this information as part of the default hardware inventory and information already present in SCCM database.
Follow the below steps to get the details.
- In Configuration Manager admin console, navigate to Monitoring / Reports and search “AutoPilot”.
- From the result, select “Windows AutoPilot Device Information” report and Run the report.
- Export the result to CSV file.
ConfigMgr CMPivot Utility
CMPivot is in-console utility introduced in Configuration Manager version 1806. CMPivot allows SCCM admin to initiate a live query on select computers. The device must be online and accessible to collect the information using CMPivot tool.
Follow the below steps to collect hardware hash using CMPivot utility.
- Launch Configuration Manager Admin Console
- Navigate to device collection and select any device collection that you want to collect the Hardware hash.
- Right-Click on Device collection and select Start CMPivot.
You will now see CMPivot application opened. Follow the steps mentioned below to open Get Autopilot CSV info script from the Community hub and get hardware hash using that script.
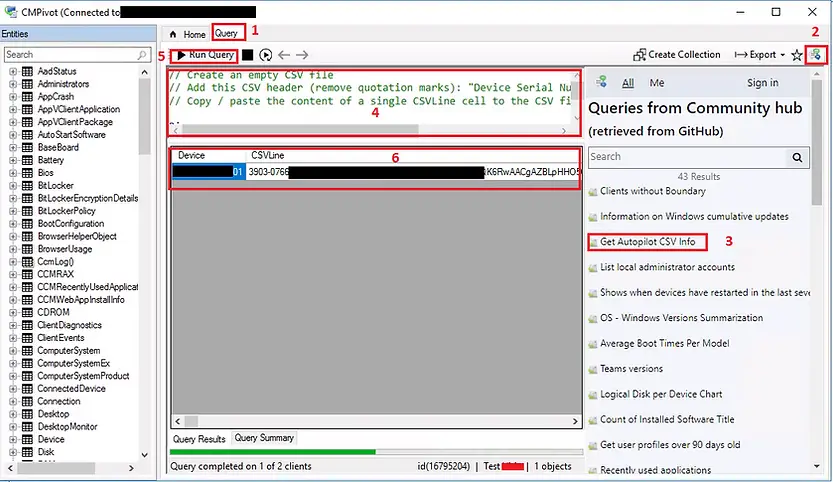
- Click on the Query tab.
- Click on Community hub icon on the top right corner. Wait for the list. It may take sometime.
- Click on Get Autopilot CSV info script
- You will see the script in query editor
- Click on Run Query
- You can see the result in Result pane
Related Posts:
- Windows 10 Autopilot Deployment Guide | Intune
- Intune – Configure Enrollment Status Page (ESP)
- Intune – Windows 10 MDM- Basic troubleshooting
- Bulk enrollment of Windows 10/ 11 Device to Intune using Provisioning Package
- Enroll Windows 11 Device to Intune through Azure AD Join method
- Windows 11 enrollment with Provisioning package failed with error code 0x800700b7
- How to Obtain Hardware Hash for Manually Registering Devices with Windows Autopilot
Subscribe to Techuisitive Newsletter
Be the first to know about our new blog posts. Get our newsletters directly in your inbox and stay up to date about Modern Desktop Management technologies & news.