Changes in the BIOS settings across site(s) have always been a cumbersome task for the IT shops when it comes to deploy it to an existing PC fleet. Not anymore! Let me guide you unleash the super-power that lies beneath HP Client Management Script Library.
Pre-requisites:
- PowerShell 5.1 or higher
- Windows 10 version 1709 or higher
- System Manufacturer = HP
Let’s get started…
In this article, I will walk you through how to:
- Generate the secure BIOS password file and encryption key.
- Deploy the script to apply the desired BIOS settings across the fleet.
PowerShell Script
Download the zip file (the .zip file contains):
HP-BIOS-Settings-Compliance.zip
- Manage_BIOS_Settings.ps1 – script to enforce desired BIOS settings.
- Script and supporting files to generate a secure BIOS Setup Password file and corresponding AES encryption key – for customers who have set a unified BIOS Setup password across their fleet.
- AES.key
- Generate_SecurePassword.ps1
- Password.txt
Script Details
- The script will only run on HP manufactured devices and excludes virtual machines.
- You must run the script with Administrative privileges.
- Download the HP Client Management Script Library installer from https://www.hp.com/us-en/solutions/client-management-solutions/download.html and include the executable with the script.
- Ensure that .ps1 and .exe files are in the same folder.
- Logs are output to “C:\ProgramData\HP\CMSL\Logs\<computername>_BSC.log”
- BitLocker is suspended for one reboot to apply BIOS settings, then BitLocker is re-enabled upon reboot.
- A reboot is not required for settings to take effect – only to re-enable BitLocker.
- The script will exit without action if a BIOS password exists on a device but has not been specified in the script. If your devices share a unified BIOS password, you should use the enclosed “Generate_SecurePassword.ps1” script to generate a BIOS password file and corresponding AES encryption key to package with the BIOS update script. However, DO NOT call on the “Generate_SecurePassword.ps1” file in your “Install” Program in SCCM or any other Endpoint Management tool you prefer to deploy the PowerShell script that will apply BIOS settings remotely.
- The script demonstrates applying the following BIOS settings by executing the default script. Note that some BIOS settings may differ based on the device model and BIOS version. Please ensure you perform adequate testing before rolling out the script to your fleet. *NOTE: There are hundreds of settings in the BIOS, you can add / remove as many functions within the script to enable / disable certain settings in the BIOS that adheres to the recommendations from your IT shop.
- Set HP Application Driver to Enable
- Set DMA Protection to Enable
- Set Pre-boot DMA protection to All PCIe Devices
- Set Virtualization Technology (VTx) to Enable
- Set Virtualization Technology for Directed I/O (VTd) to Enable
- Set Configure Legacy Support and Secure Boot to Legacy Support Disable and Secure Boot Enable
- Set Video Memory Size to Maximum
- See below table for the Standard Exit Codes Output by the PowerShell Script:
| Exit Code | Description |
| 0 | There is no error |
| 8 | Non-HP manufactured PC |
| 27 | OS version not supported |
| 64 | CMSL installer not found |
| 65 | CMSL install failure |
| 343 | General exceptions |
| 216 | BIOS password incorrect |
| 217 | BIOS download failure |
Deploying the Script to Set the Recommended BIOS Settings
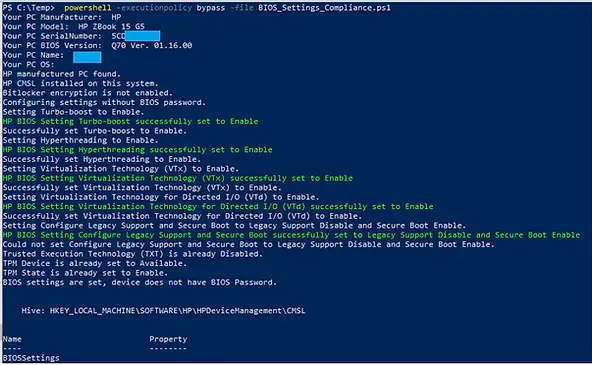
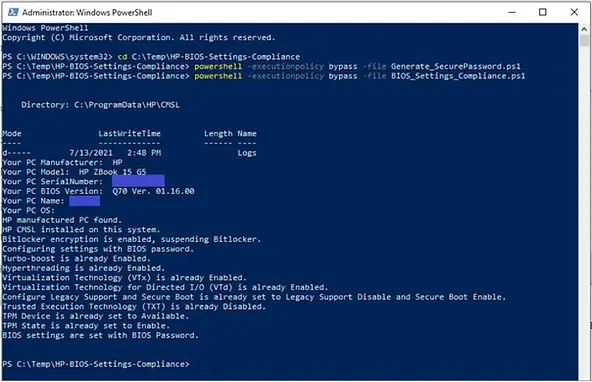
Some examples of Endpoint Management tools you can use to deploy the script are Microsoft System Center Configuration Manager, Microsoft Endpoint Manager, VMware Workspace ONE, Tanium, DesktopCentral, Altiris etc. In the Endpoint Management tool of your choice, create a device group for the targeted devices regardless if the BIOS settings are set as per recommendations of your IT Organization or not and target the script to those devices. In production environment, the script can be run silently, but for purposes of this article, we are showing the script’s output when run in a command prompt:
Generating the Secure BIOS Password File and Encryption Key
If you have set a unified BIOS Setup password across your fleet, run the included “Generate_SecurePassword.ps1” script to generate a secure password file and AES encryption key. This approach assumes that all devices share the same BIOS password.
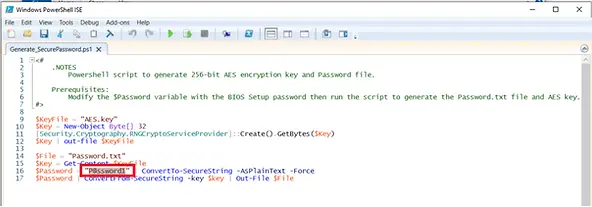
- Enter the BIOS Setup password in the “Generate_SecurePassword.ps1” file. In this example, the password is “P@ssword1”
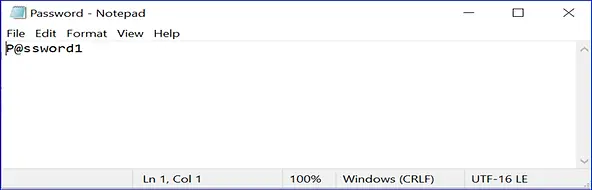
- Enter the same BIOS Setup password in the “Password.txt” and save the file.
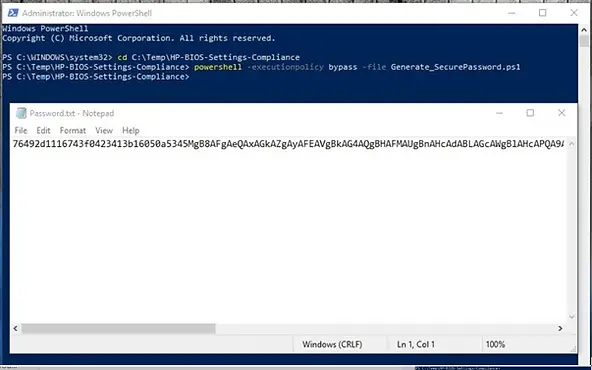
- Run “Generate_SecurePassword.ps1” to generate a secure password.txt file and AES.key encryption key.
- Include both the “Password.txt” file and “AES.key” files along with the “Manage_BIOS_Settings.ps1” script & the “CMSL installer” when creating a Package and deploying to your fleet.
Review BIOS Setting Changes
Finally, let’s see how you can determine whether the BIOS setting changes have taken effect.
To review the BIOS setting changes:
1. After the successful deployment of the “Manage_BIOS_settings” script,
Launch PowerShell and run this command:
Get-HPBIOSSettingsList | Out-File -FilePath ‘C:\ProgramData\HP\CMSL\Logs\BSC.txt’

2. Open “BSC.txt” file from the file location “C:\ProgramData\HP\CMSL\Logs” and review the settings as written in the script.
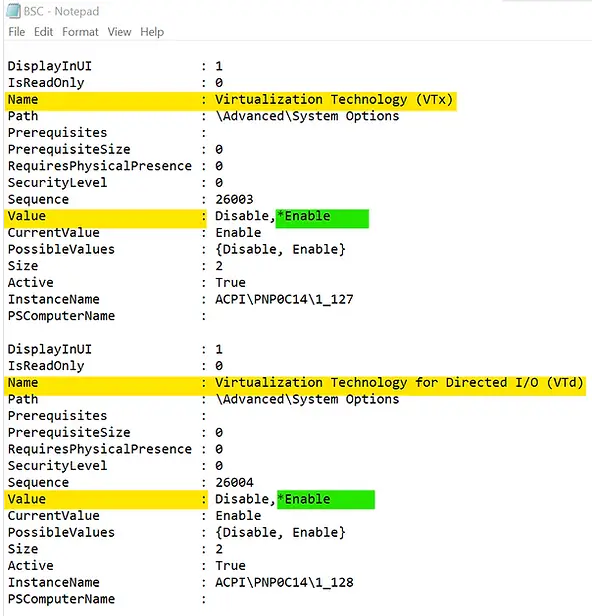
* indicates the currently ‘enabled’ or ‘selected’ values. For example, if you look at the below screenshot that I took from BSC.txt file, you’ll see the highlighted value is *Enable for the setting named “Virtualization Technology (VTx)”. Similarly, look for the other settings you intended to modify as per the script.
To monitor the BIOS setting changes across the fleet:
- You can add WMI classes you want to inventory to SCCM DB and write a WQL query to generate the report. For the HP systems – the information is all stored in the HP Namespace: root/hp/instrumentedBIOS. In order to get this information into ConfigMgr, you just need to add the classes to your SCCM Hardware Inventory.
When you add new classes to Configuration Manager hardware inventory, the size of the inventory file that is collected and sent to the site server will increase. This might negatively affect the performance of your network and Configuration Manager site. Enable only the inventory classes that you want to collect.
HP offers Proactive Insights powered by HP TechPulse, a powerful telemetry and analytics platform that provides all the actionable insights for the enrolled devices through a single, simple to use dashboard (SaaS application).
Using HP TechPulse dashboard, you can (among many other things)…
- Identify current BIOS settings on the devices across your end user computing environment and easily decide which computers you need to target for the deployment via your Endpoint Management tool such as SCCM.
- Monitor the BIOS setting changes using an Excel report extracted from HP TechPulse after the successful deployment of the BIOS settings compliance script.
Additional Information:
- Detailed CMSL syntax available here
- HP CMSL Installer is available to download from HP Download Library
Please ensure you perform adequate testing before rolling out the script to your fleet.
* Please feel free to reach out with any comments or questions!
Related Posts
- Manage Battery Health Manager (BHM) Settings with HP CMSL
- Updating BIOS Version with HP CMSL
- Manage BIOS Settings with HP CMSL
- SCCM OSD – Domain Join Failed with Error code 0x54b on HP Elitebook 840 G8
- SCCM Device Collection Based on Computer Hardware Details | ConfigMgr
Subscribe to Techuisitive Newsletter
Be the first to know about our new blog posts. Get our newsletters directly in your inbox and stay up to date about Modern Desktop Management technologies & news.